When a customer buys our tubing we want them to be able to start utilizing it right away. One large difference between us and our competition is that we make it easy for you to learn the basics of cutting and bonding even before you buy from us. We realize that a little customer service can take us far with our customers. This is why we published our cut and bond page. We plan plan on contributing to this page on a regular basis to give you the inside scoop on working with this specialized material.

SIMPLE CUT AND BOND GUIDE

-DISCLAIMER-
The purpose of this bonding guide is to explain the basics of bonding carbon fiber tubing. Any information contained in this guide should be considered a recommendation only. Due to the wide variety of loading scenarios and application conditions CarbonFiberTubeShop.com (Ultra Carbon Fiber) accepts NO liability for any injury, loss of life, or damage to property caused by following the instructions in this guide. You are ultimately responsible for making sure your project is safe and successful. When building structures with our tubes you are responsible for obtaining suitable engineering guidance to ensure that an appropriate factor of safety is met. With that out of the way let's get started with our bonding example.

STEP 1: The first decision you face when bonding tubes together is which adhesive to use. There are many variables that must be accounted for before you select an adhesive for your project. These may include but are not limited to the temperature range in a given application, chemical exposure if any, and weather exposure. For this test we have selected Loctite 9430 as shown in the image below. This is a room temp curing, two part epoxy designed for structural bonding. We chose this epoxy due to it's high peel and shear strength coupled with it's resistance to environmental factors. You can view the the technical document published by Loctite here. This epoxy is easy to use but has a cure time of about 5 days. You may also oven cure this epoxy for faster cure. Please read the entire technical document before moving forward. We suggest you print it out at this point so that you may refer back to it later on.


STEP 2:
Here are the 3 tubes that will be bonded. The inner ferrule has been cut so that about 3" of the ferrule will be bonded into tube A and 3 inches will be bonded into tube B. In this way we can take two short lengths of tubing to create one longer tube. This ferrule has a "0 deg" bias layup and is sanded to a tolerance that will provide a proper bond gap. A bond gap is the difference between the OD of the inner ferrule and the ID of the outer tube divided by two. Here is a diagram that shows what a bond gap is:


With this epoxy and our carbon tubing the minimum bond gap is about .007"-.008" and maximum .015"-.016". The bond gap will effect the strength of the bond and must be tested for your application. The bond gap may be different if another adhesive is used. If a larger bond gap is used you may want to use a bonding fixture to ensure you have a concentric bond gap. Some other methods of obtaining a concentric bond gap are gauged wire wrapped around the OD of the inner ferrule tube or you can mix a small amount of properly sized glass microspheres into your resin prior to bonding. This ensures you have an equal amount of adhesive filling the bond gap. The issue of a concentric bond gap may become more critical when bonding dissimilar materials together such as aluminum and carbon. When two dissimilar materials remain in contact, in some environments galvanic corrosion may become a problem if the two materials are not kept out of contact. A concentric bond gap may be used to keep the materials from touching as well as very thin fiberglass veil.


STEP 3:
After we have all of the tubes sized to a correct dimension for bonding we can start to prepare the inner diameter of the tubes for bonding. Prior to molding a tube on a metal mandrel the mandrel must be seasoned with a mold release chemical. This release chemical allows the carbon tube to separate from the mandrel after the tube is cured. Without this chemical the tube would stick to the mandrel. We need to remove this release chemical prior to bonding. The image below shows a tube that has not been prepped.


There are several methods of preparing the main tube inner diameter. The easiest method is to sand the inner diameter with 150-220 grit sandpaper until the release chemical has been removed and the surface properly abraded. Removal of the release chemical is your first priority but the tiny scratches introduced by sanding also increase the effective bonding area slightly which will in turn increase the bond strength. You should avoid abrading too much because sanding too deeply will start tearing into the carbon fibers which will begin to weaken the tube. You should abrade to the point where your sanding dust starts turning black. You should abrade the surface as uniformly as possible.


This is what your tube should look like if you're using sandpaper to abrade the tube. Notice the scratches in the surface are variable in their direction. Verify that you have abraded deep enough into the diameter of the main to tube for the bond depth of the inner ferrule at this point. The ferrule tube outer diameter will be bonded into the main tubes and should be abraded in the same manner as the inner diameter of the main tubes.


STEP 4: Now it's time to clean the surface of the tubes. We recommend cleaning the tube first with water and a low lint paper towel. Once the surface is free of dust you can perform a water break test. This test will verify that you have removed the release chemical on the inner diameter of the tube. To perform the test just wet out the abraded surface and watch how the water acts. The water should appear to wash out. Any beading means the surface is not free of contamination (release chemical). The tube should be completely dry before you degrease the surface. Make sure all the tubes to be bonded are ready for this step so that you don't contaminate any clean tubes with more sanding dust. Put on some clean latex gloves and start to degrease every surface to be bonded by wiping with Acetone. Acetone will remove the oils that may have transferred from your skin. Do not skip this step! Even if you have washed your hands they still have oil on their surface. Keep degreasing the tubes with a white lint free cotton towel or paper towel until you don't see any black dust on the towel or at least the dust you do see is very minimal. Now set the tubes in a clean place. If you are bonding aluminum inserts to the carbon tubes you should bond immediately as some metals develop a film after you abrade them. If you will be prepping and bonding a lot of tubing you may want to buy one or more flexible cylinder hones. Cylinder hones come in a variety of sizes depending on the tube diameter you are prepping. Cylinder hones have carbide abrasive embedded in balls at the ends of flexible plastic spindles. As a result, they remove material rapidly and leave a smooth, even finish. These tools are available through many online tool resources and cut down on the prep time quite a bit.


STEP 5: Now it's time to mix up your resin and hardener. Mixing resin doesn't not need to be a complicated process. You will need a plastic or paper mixing cup with a flat bottom as well as a flat plastic mixing stick. A wooden tongue depressor or plastic butter knife will work fine. You also need a scale that measures in grams. These can be purchased at online or at any big box store. If it doesn't measure in grams it won't work. If you haven't done so already please read the Loctite Techincal Document for Hysol 9430. When you're ready, turn your scale on and and make sure it is zeroed out. Now set your empty mixing cup on the scale. If your scale has a tare function hit that button and you should be at zero again. Even though the cup has insignificant weight it's a good idea to get into the habit of mixing correctly. Now pour enough resin (in the larger can) into the mixing cup to meet the needs of the job. Hysol 9430 needs to be mixed at a ratio of 100 parts resin to 23 parts hardener by weight for best performance. This means if you pour in 200 grams of resin you will need to follow that with 46 grams of hardener. After you pour the resin into the cup write the number down and tare the scale again and pour in hardener to the correct weight. Once you have the correct proportions in the cup you can start to mix the two parts together. At 77 deg F you have a 50 minute pot life or working time. This estimate is based on 250 grams of mixed resin. If the temperature is higher or the resin weight is greater than 250 grams your pot life will start to decrease so keep that in mind while you're working. Cooler temps will result in a longer mixing time and vice-versa. Mix the resin for 5 minutes or longer if needed to achieve a uniform mix. Every once in a while scrape the bottom and sides of the mixing cup with your stick. After you scrape the bottom and sides of the cup wipe your mixing stick on the rim of the cup. If you do not scrape the sides and bottom of the cup you could end up with an incorrect ratio. Keep your mixing slow and direct so that you don't whip too much air into your resin. Once the color and viscosity of the resin and hardener look uniform you are ready to bond.


STEP 6: With a short resin brush apply a thin layer of resin into the inner diameter of the main tubes. Do not paint too much resin into the ID because it will be pushed back when the ferrule is pushed into the tube. This will increase the weight of the finished structure which is not what we want. Run your brush over the same areas a few times to make sure the resin finds it's way into all those little scratches you made while prepping the tube.


Now brush some resin on the OD of the ferrule, most of this resin will squeeze out when the ferrule is pushed into the main tube. Keep the other side of the ferrule free of resin at this point so you have something dry to hold on to.


Now slowly push the ferrule into the main tube to the point required. Give the tube a slight twist as you are pushing the tubes together. You can use a silver Sharpie to mark the bonding depth. Do not push the pieces in quickly Make sure you have something under the assembly to catch the squeeze out. This picture illustrates how little resin is actually in our bond gap.


Once you are satisfied with the bond depth you can brush resin onto the other side of the ferrule. Keep a spot large enough for your finger free of resin so that you can hold the ferrule in place as you press main tube B over the exposed end of the ferrule.


As you push the tubes together take advantage of that dry spot and make sure the ferrule doesn't move as you press the other main tube down the ferrule. You want to make sure you have about the same length of ferrule in each tube. Once you get to the point where you have no more room for your finger you can slowly twist and push the two tubes together. If you are gentle you will see get little movement of the ferrule.


Below you can see the remaining resin squeeze-out taking place. Once the tubes are butted up against each other you can wipe off the excess resin with a dry paper towel. When this is done pour some acetone on a paper towel to the point where the paper towel is just barely damp with solvent and clean off the rest of the resin so you have a resin free bond area. DO NOT pour acetone over the areas itself or it will weaken the resin around the tube joint. Once epoxy has cured you cannot clean it with any type of solvent so make sure you clean it up now. This goes for anything in your work area that may have resin on it. Get it off now or it won't be coming off without sanding. In general epoxy is very tough and bonds well to many surfaces.


Now you should fixture the tubes together while the assembly cures. As noted on the Loctite document this resin will take up to 5 days to fully cure at room temperature so make sure you don't have a deadline that is is coming up sooner than 5 days. If you have access to a heat source you can decrease the cure time. We used a simple bungee strap on either side of the tube to keep the pieces clamped together but there are many ways to fixture an assembly. Also note that the gap is barely visible and the weave pattern is matched in the image below. You must have a square cut on each tube to avoid a large gap where the tubes butt up against one another. That's it!


We hope that this bonding guide has been helpful to you. We wish you success with your project and we are happy to answer any questions that may come up at sales@carbonfibertubeshop.com Please remember that we can handle any bonding for you at a cost of $45 for the first bond and $10 for each additonal bond.


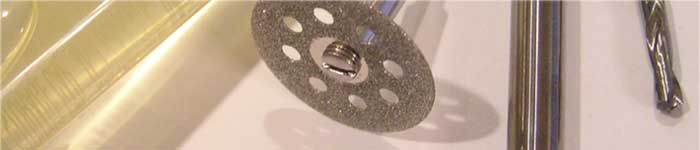
CUTTING FAQ

How do I cut carbon fiber tubes? This is a common question and the answer will depend on what the type of cutting equipment you have access to and the amount of cutting you have. The tools required to cut carbon tubing could be as basic as a hacksaw or as extravagant as an industrial wet saw costing thousands of dollars. Before I get into the specifics of the task at hand let me remind you that Ultra Carbon Fiber (cfts) accepts no responsibility for injury or loss as a result of cutting carbon tubing. This FAQ is to be used as guide but you are solely responsible for the safe operation of any tools or equipment you decide to use. Working with power tools is dangerous and all possible safety measures should be taken to avoid personal injury. Now that we have that stuff out of the way let's move into he possible cutting options available. At the inexpensive end you can cut carbon tubing with a basic hacksaw. To cut tubing with a hacksaw I suggest wrapping the cut zone with a wrap or two of basic masking tape prior to cutting the tube. This will minimize fiber break out at the cut zone. In order to cut the tube you need to have a suitable way to hold the tube that is being cut. I would suggest a vice of the appropriate size for the tube and make sure the vice is equipped with rubber pads or some other padding to make sure you don't hurt the tube surface. Use very light clamping loads or you may delaminate a layer inside the tube. Use only enough pressure to hold the tube. Our stock tubes are designed to resist bending loads and not crushing loads. Although we can custom build custom tubes that will resist such loads you need to take great care when clamping our stock tubes. The relative strength and stiffness of a given tube depends mainly on fiber orientation so be careful. Once the tube is tape wrapped and clamped in place you can begin to saw the tube. Since you are using a hacksaw it would be a wise idea to cut the tube about 1/16" long and then sand back to your needed length. Saw in long smooth strokes and let the tool do the work. Carbon is very abrasive so don't expect a hacksaw to last more than a few cuts before it starts to dull. Use a hacksaw with very fine teeth like what you might use for cutting plastic or if you can find an abrasive only blade with no teeth that would be even better. Here is an example of a hacksaw blade with a carbide grit cutting edge: http://www.mytoolstore.com/starrett/hack03.html I would not suggest a hacksaw for any type of production cutting but it would work for a few cuts. If you have an uneven cut you can block sand it square with 100-150 grit sand paper.

The second method for cutting tubing is similar to the first but instead of a hacksaw you can use a Dremel and a 7/8" diameter diamond coated cutting wheel. Here is a link to the cut off wheel as seen at Amazon: Dremel Wheel You can also purchase these wheels at your local hardware store Home Depot, Lowes etc but make sure you buy a Dremel brand wheel. Having tried knock off's from Harbor Freight and other sources they just don't math with the quality of a Dremel brand wheel. They aren't cheap at $15 but they make very precise cuts. The industrial diamond coating makes fast work of carbon and they last quite a long time. The main difference in cutting with a Dremel wheel and a hacksaw is one is powered and one is not. Since a Dremel spins at 15-30K rpm you will certainly need some safety glasses and a painters dust mask isn't a bad idea. A Dremel will kick off a lot of fine carbon dust which will cover everything around so keep that in mind when choosing a place to cut. You might also decide to have a helper hold a shop vac within about 5-6" of the tool to pull the dust while you make the cut. The dust is not toxic but the fine particles can get in your lungs so take the same precautions you would take when cutting wood for instance. The other downside to using a Dremel is that you can't make a square cut holding a tool free hand but you can black sand the cut end to square it up. Cutting the tubing at this rpm without a cooling medium (dry) not only kicks up dust but it heats up the resin in the matrix which will weaken the resin locally at the cut zone. In some applications this weakening may cause a structural issue but that will be left to your discretion.

The third method of cutting carbon tubing is with a wet tile saw or any other saw that uses a cooling medium such as water and allows the use of a non toothed blade. The price of a tile saw starts at about $80 and goes above $5,000 depending on the brand, size of tubing you need to cut, and the options the saw includes. Starting at the low end you could buy a saw such as this tile saw from HF

Link to buy this saw online

Your local HF probably carries something similar to the saw above. Saws such as this are limited in the outer diameter that they can cut usually to about an inch OD so if you are using larger tubes you will need a different saw. A word of caution about this saw is you will need to remove the blade that is included with the saw and throw it away promptly. The diamond coated blade has rather large grit sizing and tends to splinter the cut and tear up the edge of the cut zone so it isn't really ideal for cutting carbon. If you were to think of the grit sizing like sand paper it would be somewhere around 60 grit which is way to low. The most important part of the equation here is the quality and specification of the blade so you will need to source it somewhere else. If you can't find one you can have one custom made by UKAM They are specialists in diamond blades and will build you a custom blade for $80-$100. I would suggest calling them 3 weeks before you need the blade. When you call them tell them you are cutting carbon epoxy laminate and be sure to tell them which arbor your saw has. Ironically the blade cost more than the saw itself but it will yield good results for low to medium volume cutting of sections 6-7" long or less. The main downside to this setup is that it can be difficult to set up the cutting fence accurately and the push block is hard to keep aligned with the fence but with practice you can net good results on a relatively low budget. Again placing one layer of masking tape at the cut zone will only improve the cut quality but it is a time consuming. It's amazing the difference a little tape can make. The upside of cutting with water is that the dust is not an issue at all so you don't need to cover the shop in plastic before cutting and it cools the cut zone so it really is the best way to go. For higher production cutting I would suggest an MK saw as shown:

Link to buy the saw online

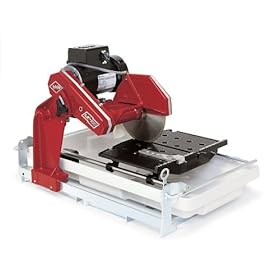
This wet saw is a real gem because you can hold the stock against the fence and the slide the entire table top through the cut so it makes very precise cuts and is capable of doing it for hours on end. It can cut tubing over 3" in diameter so that is another plus. We have one of these saws in our shop and use it quite often. I would suggest buying a new blade from UKAM but the blade that is included isn't that bad so you could get by with the stock blade. You would probably be into the setup about $1,000 with shipping and a new blade but it is good value for the money and they are made right here in the USA. Beyond this level the saw increase in size and accuracy but unless you are running your saw 24/7 you probably don't need anything more than an MK. UKAM offers higher end saws and I'm sure they would be happy to quote you pricing if you need something larger than the MK.

To finish off the cutting FAQ I thought I would specifically address a few issues that people ask about most often. I am often asked, can I cut your tubing with a metal chop saw or even a miter saw. The answer is yes but I wouldn't recommend it. A chop saw really heats up the cut zone and throws off a lot of dust. Besides being a pain to deal with carbon dust can get into electric motors and short them out since carbon is conductive. With a water cooled saw the dust is no longer a problem. If you don't want to invest in using the proper equipment we would be happy to handle your cutting no matter if you need one cut or 1000 cuts. For the fist cut we charge $5 and the second cut is $1.50 up to 10 cuts. Once you get beyond 10 cuts we will custom quote the cutting on a per job basis. We routinely have cutting jobs of several hundred cuts so we can often cut and ship within a day. I hope that this cutting information gives you some helpful insight into another aspect of working with our product.


Copyright 2024 Carbon Fiber Tube Shop